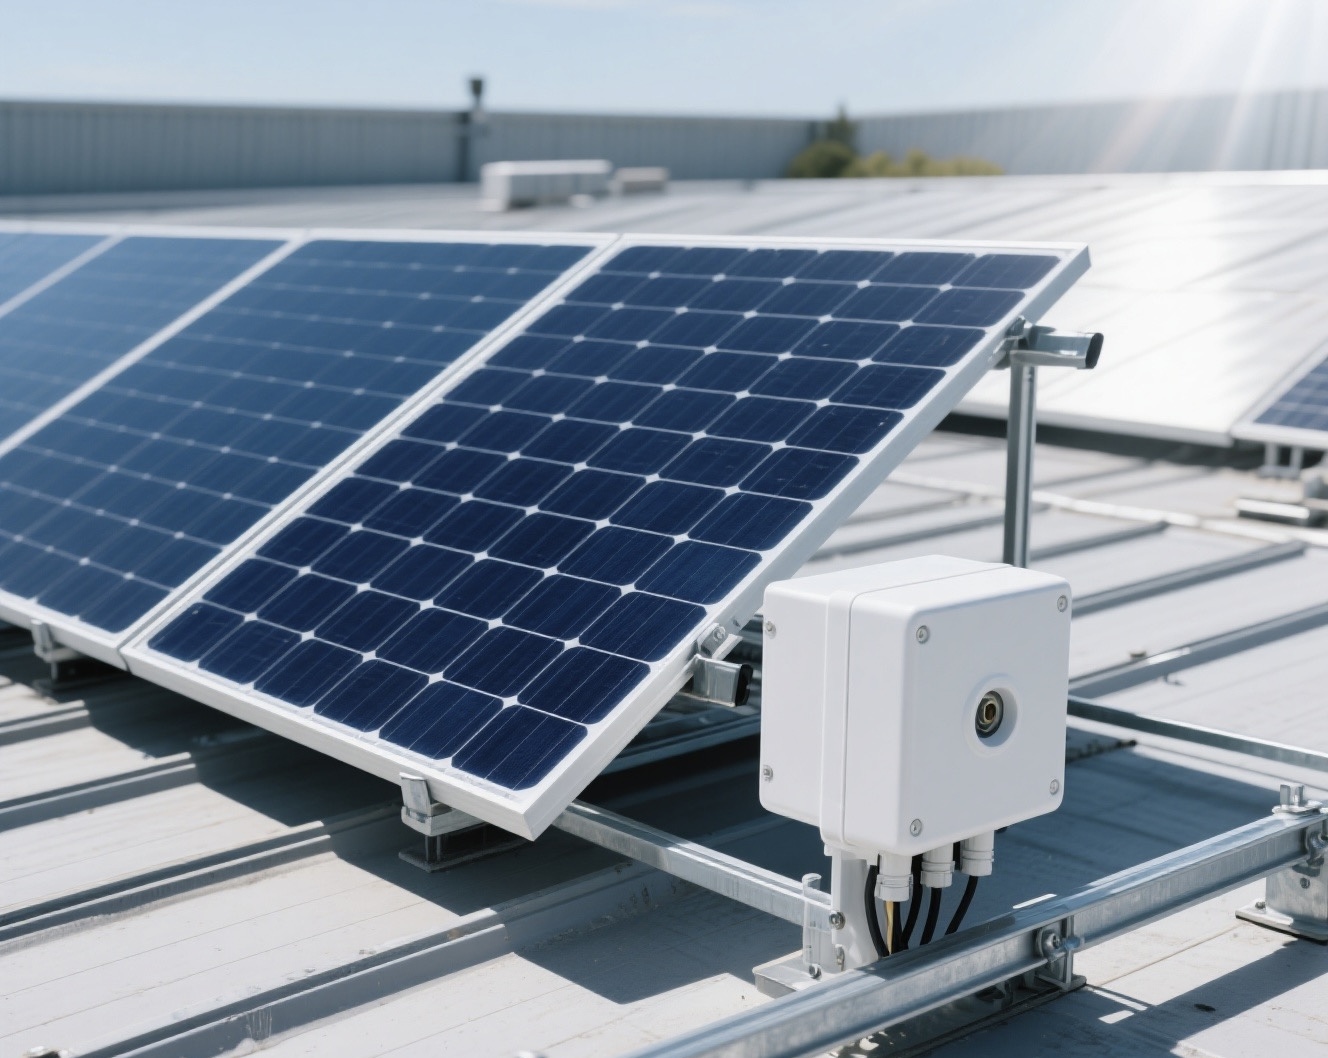
Solar energy systems are revolutionizing the way we power homes and businesses, but their performance hinges on the quality of even the smallest components. One such critical component is the solar junction box, which protects your PV system’s electrical connections and ensures seamless energy flow. Whether you’re installing a new system or upgrading an existing one, selecting the best solar junction box and understanding how to select a solar connector box can make or break your system’s efficiency, safety, and longevity.
In this guide, we’ll walk you through the top factors to consider when choosing a solar junction box, ensuring your PV system operates at peak performance for years to come.
Why the Solar Junction Box Matters
A solar junction box is the “nerve center” of your solar panel. It serves three key roles:
1. Protection: Shields electrical connections from environmental hazards like moisture, UV rays, and dust.
2. Safety: Prevents overheating and fire risks by managing electrical currents.
3. Efficiency: Bypass diodes inside the box minimize power loss if a panel is shaded or damaged.
Choosing the wrong junction box can lead to system failures, costly repairs, or even safety hazards. Let’s dive into how to make the right choice.
Key Factors to Consider When Choosing a Solar Junction Box
1. System Voltage and Current Ratings
Every PV system has specific voltage and current requirements. To select the best solar junction box, check your panel’s specifications:
Max System Voltage: Most residential systems operate at 600–1000V. Ensure the junction box’s voltage rating matches or exceeds this.
Current Capacity: Calculate the short-circuit current (Isc) of your panels. For example, a panel with a 10A Isc requires a junction box rated for ≥10A.
Pro Tip: Oversizing the current rating by 20% adds a safety buffer and future-proofs your system.
2. Bypass Diodes: The Secret to Minimizing Power Loss
Bypass diodes reroute electricity around shaded or damaged cells, preventing energy loss. Look for:
Low Forward-Voltage Drop Diodes (e.g., Schottky diodes): These reduce heat generation and energy waste.
Number of Diodes: Most residential panels use 3 diodes (one per cell string). Larger systems may require more.
Avoid Cheap Diodes! Low-quality diodes fail quickly, leading to hotspots and permanent panel damage.
3. Weather Resistance and Durability
Since junction boxes are exposed to harsh outdoor conditions, prioritize:
Material: Polycarbonate or ABS plastic offer UV resistance and durability.
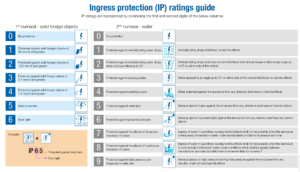
IP Rating: Opt for IP67 or IP68-rated boxes for dust/water resistance.
Temperature Tolerance: Ensure the box can handle your local climate (e.g., -40°C to 85°C).
Example: A coastal area with high humidity requires a corrosion-resistant, IP68-rated junction box.
4. Cable Entry and Termination Design
A poorly sealed junction box invites moisture and debris. Look for:
Easy-to-Install Cable Glands: Waterproof glands that accommodate various cable sizes.
Secure Termination Options: Screw terminals or spring-clamp connectors for reliable, tool-free installation.
Warning: Loose connections increase fire risk. Always test terminations before finalizing installation.
5. Compatibility with Connectors
Ensure the junction box matches your panel’s connectors (e.g., MC4, Tyco, or Amphenol). Mismatched connectors can cause:
Arcing (dangerous electrical sparks).
Energy loss due to poor conductivity.
Pro Tip: Use junction boxes from the same brand as your solar connectors for guaranteed compatibility.
6. Certifications and Compliance
Reputable manufacturers adhere to international safety standards. Look for:
UL 6703 (U.S. standard for connector compatibility).
TÜV Rheinland or IEC 62790 (global certifications for junction box safety).
Red Flag: Avoid uncertified products, even if they’re cheaper. They may void your panel warranty.
7. Brand Reputation and Warranty
Established brands like TE Connectivity, Amphenol, or Hubbell invest in R&D for reliability. Check:
Warranty Length: 10–25 years is industry standard.
Customer Reviews: Look for feedback on long-term performance in real-world conditions.
Example: A junction box with a 15-year warranty signals confidence in product durability.
Common Mistakes to Avoid
1. Ignoring Local Climate: Using a basic IP65 box in a flood-prone area.
2. Overlooking Diode Quality: Prioritizing cost over diode specifications.
3. Mismatched Voltage Ratings: Choosing a 600V box for a 1000V system.
How to Select a Solar Connector Box: Step-by-Step Checklist
1. Review Panel Specs: Note voltage, current, and connector type.
2. Calculate Safety Margins: Add 20% to current/voltage requirements.
3. Verify Certifications: Ensure compliance with UL, TÜV, or IEC.
4. Compare Brands: Prioritize warranties and customer support.
5. Test Compatibility: Confirm connectors and cables fit securely.
In Conclusion
Choosing the right solar junction box is a critical decision for your PV system. By considering factors such as system voltage and current, bypass diodes, weather resistance, cable entry and termination, number of connectors, and brand reputation, you can select the best solar junction box and solar connector box for your needs. This will not only improve the efficiency of your PV system but also ensure its long – term reliability and safety.
FAQs About Solar Junction Boxes
Q: Can I replace a faulty junction box myself?
A: Only if you’re trained in PV systems. Improper installation risks electrocution or fire.
Q: How often should junction boxes be inspected?
A: Annually, or after extreme weather events. Look for cracks, discoloration, or loose cables.
Q: Do all panels come with junction boxes?
A: Yes, but aftermarket upgrades (e.g., higher IP ratings) may improve performance.